2014年11月5日水曜日

AndroidのArrayAdapter#notifyDataSetChangedの謎

どうも。うにあです。

 ArrayAdapter#notifyDataSetChangedのソースコードを見たことありますか??

 /**
 * {@inheritDoc}
 */
@Override
 public void notifyDataSetChanged() {
    super.notifyDataSetChanged();
    mNotifyOnChange = true;
}
{@inheritDoc}となっているのでBaseAdapterのJavaDocを見てみる。
 
    /**
     * Notifies the attached observers that the underlying data has been changed
     * and any View reflecting the data set should refresh itself.
     */

データ変更をオブザーバに通知してViewに反映するメソッドですよね。ご存知の通り。

でも僕の疑問はなぜ、
mNotifyOnChange = true;
があるのかということなんですよねー。
notifyDataSetChangedを呼ぶとフラグがtrueにされてしまう。そのフラグはsetNotifyOnChangeというメソッドで操作できる。

setNotifyOnChange(boolean notifyOnChange)
Control whether methods that change the list (add(T)insert(T, int)remove(T)clear()) automatically call notifyDataSetChanged().


個人的に複数のデータを仕方なくfor文で登録しようとすると

1. setNotifyOnChange(false)
2. for文内でaddやinsertを複数回行う
3. setNotifyOnChange(true)
4. notifyDataSetChanged

というイメージで実装するのかなと思っていたのに。。いや、これで正しいとは思うんですが、notifyDataSetChangedを一度呼び出してしまうとfalseになっていたものがtrueになってしまうので注意が必要だというお話でした。

なぜこのようになっているのか疑問。。。誰か教えてください。。。


2014年10月29日水曜日

AndroidのArrayAdapterのnotifyDataSetChangedについて

AndroidのArrayAdapterのnotifyDatasetChangedについて

notifyDatasetChangedをAdapter外で使うのはよくないよなぁ。ってかそもそもnotifyDatasetChangedとはなんぞやって所から始まった話。

notifyDataSetChanged()とは

     /**
     * Notifies the attached observers that the underlying data has been changed
     * and any View reflecting the data set should refresh itself.
     */
    public void notifyDataSetChanged() {
        mDataSetObservable.notifyChanged();
    }

データが変更された時にViewに対してリフレッシュを通知するメソッド。とりあえず、Viewの更新を行うと。。。

notifyDataSetChangedはadapter内で使用する!

notifyDatasetChangedはあくまでもadapterがデータ更新された時にそれを知らせるために使用するべきだと思います。とりあえず、困ったときのAndroidReferenceを見てみましょうー。

  • setNotifyOnChange(boolean notifyOnChange)
    • Control whether methods that change the list (add(T), insert(T, int), remove(T), clear()) automatically call notifyDataSetChanged().

addやinsertやremoveやclearなどListViewに何かしらの操作があった時は自動で呼ばれるということです。例えばArrayAdapterのaddメソッドを見てみる。

    /**
     * Adds the specified object at the end of the array.
     *
     * @param object The object to add at the end of the array.
     */
    public void add(T object) {
        synchronized (mLock) {
            if (mOriginalValues != null) {
                mOriginalValues.add(object);
            } else {
                mObjects.add(object);
            }
        }
        if (mNotifyOnChange) notifyDataSetChanged();
    }

確かにnotifyDataSetChangedが呼ばれてる。

以上のことを踏まえると、Adapterクラスの操作(add,insert,remove,clearなど)の時に意識せずに呼ばれるメソッドであるべきだと思います。(本当はprotectedなメソッドにしてほしい。)
ってことで、Adapter(もしくはAdapterを継承したもの)以外でnotifyDataSetChangedを呼ぶのは良くないように思いました。

@Override
public void notifyDataSetChanged() {
    super.notifyDataSetChanged();
    mNotifyOnChange = true;
}

2014年4月21日月曜日

Javaのenumの使い方。

Javaのenumと戯れてたらいつの間にかstaticブロックと戯れていました。

enumの勉強してたので、学んだことをまとめます。

サンプルとしてジャンケンプログラムを作成する場合を考えてみます。

enum Hand{
 //まずは定数の列挙
 ROCK("グー", 0),
 SCISSORS("チョキ", 1),
 PAPER("パー", 2);
 //フィールド
 private final int num;
 private final String name;
 //コンストラクタ
 Hand(String name, int num){
  this.name = name;
  this.num = num;
 }
 //メソッド
 public static Hand parseHandFromNum(int num){
  switch(num){
  case 0: return ROCK;
  case 1: return SCISSORS;
  case 2: return PAPER;
  default: return null;
  }
 }
}
System.out.println(Hand.ROCK);
System.out.println(Hand.ROCK.name);
System.out.println(Hand.ROCK.num);
とすると出力は
ROCK
グー
0
となります。
列挙型について調べてたら逆コンパイルしたら面白いとあったので、してみました。

static final class Hand extends Enum
    {

        public static Hand parseHandFromNum(int num)
        {
            switch(num)
            {
            case 0: // '\0'
                return ROCK;

            case 1: // '\001'
                return SCISSORS;

            case 2: // '\002'
                return PAPER;
            }
            return null;
        }

        public static Hand[] values()
        {
            Hand ahand[];
            int i;
            Hand ahand1[];
            System.arraycopy(ahand = ENUM$VALUES, 0, ahand1 = new Hand[i = ahand.length], 0, i);
            return ahand1;
        }

        public static Hand valueOf(String s)
        {
            return (Hand)Enum.valueOf(EnumSample$Hand, s);
        }

        public static final Hand ROCK;
        public static final Hand SCISSORS;
        public static final Hand PAPER;
        private final int num;
        private final String name;
        private static final Hand ENUM$VALUES[];

        static 
        {
            ROCK = new Hand("ROCK", 0, "\u30B0\u30FC", 0);
            SCISSORS = new Hand("SCISSORS", 1, "\u30C1\u30E7\u30AD", 1);
            PAPER = new Hand("PAPER", 2, "\u30D1\u30FC", 2);
            ENUM$VALUES = (new Hand[] {
                ROCK, SCISSORS, PAPER
            });
        }

        private Hand(String s, int i, String name, int num)
        {
            super(s, i);
            this.name = name;
            this.num = num;
        }
    }

結果はそのまんまクラス。

じゃ、クラス使ってやればよくない?と思うかもしれないけども自分はこのコードのここに注目した。
        public static final Hand ROCK;
        public static final Hand SCISSORS;
        public static final Hand PAPER;
        private final int num;
        private final String name;
        private static final Hand ENUM$VALUES[];

        static 
        {
            ROCK = new Hand("ROCK", 0, "\u30B0\u30FC", 0);
            SCISSORS = new Hand("SCISSORS", 1, "\u30C1\u30E7\u30AD", 1);
            PAPER = new Hand("PAPER", 2, "\u30D1\u30FC", 2);
            ENUM$VALUES = (new Hand[] {
                ROCK, SCISSORS, PAPER
            });
        }
これをクラス使って自分で実装する手間を省く程度に考えると、クラスかenumを使うかを自分で判断できるのかなと。

以下の記事が参考になりました。
列挙型を使う Java 5.0を使ってタイプセーフな方法で定数を表現する
Switch文の条件式にenumじゃなくてnullを入れてみた

(追記 2014/04/22)

 クラスと比較したenumの利点
 public static final int ROCK = 0;
 public static final int SCISSORS = 1;
 public static final int PAPER = 2;
 public static void showHand(int hand){
  switch (hand) {
  case ROCK:
   System.out.println("グー");
   break;
  default:
   break;
  }
 }
上記のようにクラスで実装を行うとshowHandを使う人はint型のものは全て引数に取れるということになります。 この場合showHand()内で0,1,2以外はエラー処理を行わないといけなくなりますよね。
しかし、引数showHand(Hand hand)のようなメソッドを定義するとHand型以外のものは渡せなくなります。 そういう意味でenumはタイプセーフな使い方をできるようです。


(おまけ)

staticブロック(初期化演算子)というものを初めて知ったのですが、面白い!

実際は使っちゃだめだと思うんですが、下のように宣言の前に代入するみたいな書き方もできました。配列やリストなどの組み合わせでもいろいろおもしろいことができそうです!

  static {
      num = 50;
  }
 
  public static final int num;


2014年4月20日日曜日

MacでJava標準APIを見る

Java標準APIを見てハムハムしたいと思ったんですが、src.zipなるものがどこかに入ってるらしい。
Windowsの場合の記事は多かったんですが、Macの場合の記事が少なかったためsrc.zipの場所をメモっておきます。

/Library/Java/JavaVirtualMachines/1.7.0.jdk/Contents/Home/src.zip


2014年3月8日土曜日

電子書籍と紙媒体の本、何が違うのかを個人的に考えてみた話(結論出てません)

今更感がすごいのですが、電子書籍って僕は結構使うんですよねー。

僕はどっちでもいいんですが、「電子書籍はダメ、紙媒体の本じゃないと嫌」という意見もすごく多い。

そこで、電子書籍と紙媒体の本の違いを考えたことをメモっておきたいと思います。


電子書籍の何が悪い??

僕は電子書籍が好きです。紙媒体も好きです。

しかし、電子書籍嫌いで紙媒体派の友人に聞いたのですが、電子書籍は「使いにくい」「目が疲れる」「紙の質感を楽しみたい」「なんかいや」などなどの意見が・・・・。笑

確かに同じようなことがKindleは悪みたいなことを言ってる本に書いてあった気がする。
(使いにくければ本の世界に没頭できない、シンプルなUIが必要みたいなこと)

じゃ、そこで「近未来、すごい使いやすいUIが開発されて、まるで紙を触っているような感覚で目も疲れないような電子書籍リーダが出てきたらどう?」という意地悪な質問をしてみたところ。

「んー、それでもいや。なんか違う。」

と言われてしまいました・・・。

そのまま議論を続けたところ、僕の中でいくつかの仮説が・・

「思い出の保存先による大切さ」

データよりは実物体の方が思い出を保存しやすいと思います。
スマホに入ったままの写真データよりは、印刷した写真をアルバムとかに閉じていたほうが思い出が蓄積されて大切な感じがしませんか??

電子書籍の中にある本に思い出が蓄積されるよりは、紙媒体の本の方が思い出を蓄積しやすく、本自体を大切に感じるのではないかと思いました。

「思い出の分散保存」

思い出を紙媒体に保存するときはその本ごとに保存する。
しかし、電子書籍の場合は思い出の保存先は1つのデバイス。

人間は思い出を1箇所にまとめて保存するよりも、複数箇所に分散して保存したほうが幸せに感じるんじゃないのかなぁというのが仮説です。

思い出を分散して保存することで周りにたくさんの思い出が溢れ、思い出を感じられる空間ができる。
それが幸せに感じられるような気がするんですよ。


以上、電子書籍と紙媒体の違いを「思い出」という観点から考えてみました。

-----
電子書籍(透過光)と紙媒体(反射光)を見る際の脳の動きの違いなどがあり、それぞれ利点と欠点があるなど様々な研究がされてるそうですが、今回は無視しました


2013年12月6日金曜日

コーディングを支える技術 成り立ちから学ぶプログラミング作法

コーディングを支える技術 成り立ちから学ぶプログラミング作法 ※この記事はCA14 Advent Calendar 2013の6日目の記事です。


周りがみんな為になる本を紹介しててビビりました。
普通に漫画か僕が大好きなマジシャンのマジックの本を紹介しようと思ってましたが、急遽、方向修正。笑
教授に面白いよーと勧められて読んだ本が素敵だったので紹介します!


どんな本?


某未踏やってたころに一度お会いしたことのある西尾さんの本です。
プログラミングをする際に使用する言語というものは多々ありますよね。 COBOL, CLU, C, C++, C#, Java, JS, Objective-C, PL/I, Python, Ruby・・・など書ききれないです。
その中で過去のプログラミングにおいて、設計者は何を問題点と考え、新しい言語を作ったのか。その歴史、問題点、特徴などから現在普及している言語の特徴や未解決の問題などが紹介されています。
第1章:言語を深く効率的に学ぶには
第2章:プログラミング言語を俯瞰する
第3章:文法の誕生
第4章:処理の流れのコントロール
第5章:関数
第6章:エラー処理
第7章:名前とスコープ
第8章:型
第9章:コンテナと文字列
第10章:並行処理
第11章:オブジェクトとクラス
第12章:継承によるコードの再利用
目次は↑のようになっています。
まず、4章〜12章まではがっつりな内容となっています。 しかも、著者が話したいことをただ書くのではなく、実際のコードを見ながら過去の言語と比較していくので読者が置いていかれずに読み進めることができます。
つまり、どうやってコーディングするかとかではなく、概念を考察していく本です。

ぼくのツボ


if文がない時代をアセンブリ言語から攻めるとか、エラー処理の歴史とかとってもたのしい章がたくさんあるんですけど、この本の個人的なツボは・・・
それはッ、ところどころに散りばめられたコラムーッ!! コラムのタイトルだけ抜粋すると、
理解をするためにまずアウトプット
何を学べばよいかわからない理由
具体的な知識と抽象的な知識
噛み砕く
必要なところからかじる
おおまかにつかんで徐々に詳細化する
(一部除く)
などです。
理解
ある事を勉強して、何をもって「理解できた」といえるのか?
正しいかどうかをアウトプットして第三者に確認してもらう。
学び
ひと通り学ぶことは不可能な場合が多い。何をゴールにするにするのか? 最初から完璧なものをゴールにするのか?
歩き出してから、自分ができること、学ぶべきことが見えてくる。
この繰り返しが自分の力になる
具体的と抽象的
応用範囲の限定された具体的なハウツーはどんどん価値を失う。
抽象的な概念だけを学んでもだめ。
抽象的な概念を具体的な説明に落とせることが重要。
必要なところからかじる
例えば、本やドキュメントの内容のすべてが同程度に必要な訳ではない。
重要なところをつかむ必要がある。
重要なところを探す
目次を見て構成を理解する。小見出しや強調、図表などをチェックする。
自分の目的にあった重要なところを探す。
写経
明確な「やりたいこと」「調べたいもの」がなく「おおまかに読む」場合、情報が頭に入りにくい。 そこで、知識の足がかりを作るために教科書を写経する。知識のコピーを行ってから、その足がかりを元に勉強してく。
上記のことは、プログラミングだけではなく様々なことに当てはまるのではないかと思います。


以上、「コーディングを支える技術 成り立ちから学ぶプログラミング作法」の紹介でしたー! コラムばっかり書きましたが、普通に全部面白いので、良かったら買ってみてください!!ヽ(=´▽`=)ノ
さて、明日は、szk氏か・・・期待!w

2013年12月3日火曜日

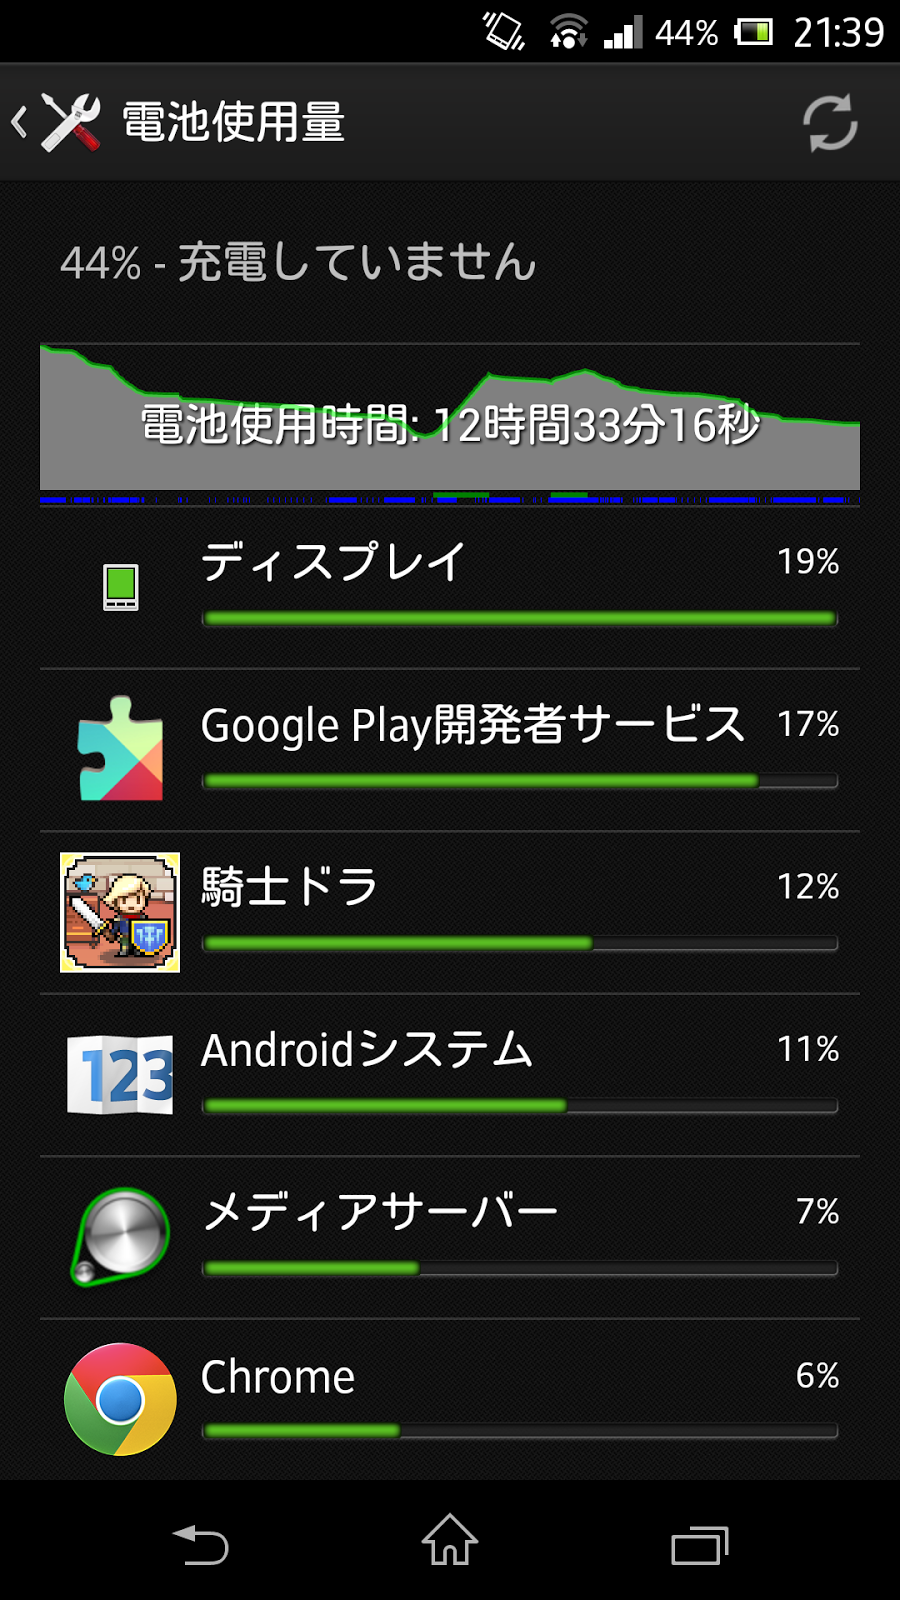
XperiaZの電池の減りが急激に早くなったけど治った

最近(Android4.2.2にアップデートしてから?)、電池の減りが急に早くなったなーって思ってました。
思ってたどころじゃなくて、画面OFF状態でも10分で1%減るくらいでした。
は・や・す・ぎ!!

犯人は。。。

電池の使用料を見ると、「GooglePlay開発者サービス」50%ほど、「ディスプレイ」が20%ほど。
普通ディスプレイが一番電池使用量が多いと思うんです。
特に、XperiaZって画面OFF時は極端に通信料を減らしている(気がするんです←)。
ですので、「GooglePlay開発者サービス」がどう考えてもあやしい。

とりあえず、再起動してみた。

調べてみると他アプリと連携してる可能性もあるのでアンインストールしたくなくて・・・。とりあえず、再起動したろっと思い再起動したら、今度はスマホの電池が50%から70%ほどに上がった。

な・ぜ!!!

それからは数日経過してるけど、元に戻ったような気がします。


電池使用量も「GooglePlay開発者サービス」じゃなく、「ディスプレイ」がトップになってるし。

まぁ、いけるでしょう!w

2013年11月8日金曜日

Texでフォント埋め込み&Type3フォントを使用していた場合の対処

2点についてです。
①Texでフォント埋め込み
TeXでPDFにフォントを埋め込む(dvipdfmx)

上記のサイトを参考に、まず、dviファイルを作成し、コマンドプロンプトで
dvipdfmx -f dlbase14.map paper.dvi
を実行するとpdfが作成され、大抵のフォントが埋め込まれている。
AdobeReaderで開いて、[ファイル]→[プロパティ]→[フォントタブ]で確認できる。
ほぼ全部に「埋め込みサブセット」と書かれていればOK


②Type3フォントの対処
上記の手順を行ってもType3フォントは埋め込まれない。
埋め込まれていないフォントは消さないと行けない。

pdfファイルにフォントが埋め込まれていない場合の対策

上記のサイトを参考にmacのプレビューからpdfを開き、pdfで書き出したらType3フォントが消えてる。
なんかこれずるく感じるけど、まいっかw

2013年10月6日日曜日

railsのコントローラでJSON返したいのに関連モデルが取得出来ない・・・

という問題で結構ハマりました。
が、検索したら普通にでてきました。笑

Railsにて関連モデルをまとめてJSONで出力する場合

だって、findとかでincludeやjoinしたものをそのままrenderするだけで、普通にJSON返せると思うじゃないですか!!
なんでですか!!

ちなみに、rails3.以降はjbuilderというテンプレートエンジンがあってこんなことしなくてもいいらしいですね。
http://railscasts.com/episodes/320-jbuilder?language=ja&view=asciicast


2013年9月24日火曜日

iPhone5S,5Cに搭載された指紋認証のすごいところ

iPhone5S,5Cが発売されて数日経過しましたねー。
やっぱり話題になっているのは指紋認証ではないでしょうか?


今回は、iPhoneの指紋認証は何がすごいのか、何故こんなにもてはやされるのかを書いていきたいと思います。


認証方法が変わったから?
指紋認証すごいですよね。
今までの認証のイメージだと、指を置いてスライドさせるイメージ。
(下のはThinkPadですが、ガラケーの頃からこんなイメージでしたよね??)

しかし、iPhoneはじーっとしとくだけになってますもんね。

昔、指紋認証付きのガラケーを使っていましたが、今考えると指をスライドさせるの面倒でしたよね。。。

やっぱり認証技術の進歩とともに、読み取り方法が変わってきて使いやすくなったので採用されたのかなと思います。


でも、ほんとに凄い所は別にある!
これってできそうじゃないですか?日本のガラケーでも、アンドロイドでも。
僕がこれに関して魅力的だなと感じていることは「知的システム」であり「知的な人工物」であるということです。

知的システム?知的な人工物?
知的システムや知的な人工物に関しては同志社大学の三木先生が研究されています。
簡単に言うと外部環境をSenseし、そのデータを元にJudgeし、何かactする。
Sense,Judge,Actの3つの要素を含むものです。
以下のリンクが参考になります。
http://mikilab.doshisha.ac.jp/dia/research/intellectualization01/intelligent/intelligent_top.html

例えば、自動ドアですね。
ドアを通りたい人が前に来るとセンサが反応し、人が来たと判断して、ドアを開ける。
もし、ドアにスイッチが付いていれば知的ではありません。

他には自動で水がでる蛇口ですね。(公衆トイレなどで見かけるやつです)
人が手を洗おうと蛇口に手を近づけると、センサが反応し、手が近くにあると判断し、水を出す。

これらは人が意識せずに、人以外のモノ(コンピュータなど)が判断し、動作する。
立派な知的な人工物です。
人の効率の向上や不必要な動作や判断を避けることができます。


iPhoneと知的人工物
iPhoneの指紋認証のすごいところに話を戻します。
この認証は知的かというと認証なので知的なのですが、いいところはホームボタンに認証機能があるということです。

ユーザは画面をつけるためにホームボタンを押し、その際に認証も行う。
これまでは、ユーザからすると画面をつけることと認証は全く違う動作でした。
しかし、iPhoneは自動で認証までユーザに意識をさせずに行うのです。
不必要な動作を避け、効率を向上する。
これは立派な知的なシステムだと思います。

もし、ホームボタンではなく、まったく違う位置に認証機能があれば、ダメな機能だったでしょう。
アンドロイドで指紋認証を載せたとしても、ホームボタンなどのユーザが普段行う動作のどこかに潜りこませないと良いシステムとは言えないでしょう。

iPhoneの指紋認証はこの知的システムだからすごい
と思います。


知的にデザインを行うことについて
人は効率を求めます。無駄なことや面倒なことはしたくありません。
無駄なことや面倒なことを避けるために、お金を使います。
身の回りでもそうでしょう。
知的にデザインを行うことは、多くの人に使ってもらうためのとても大切な要素だと思います。(お金も儲かるかも・・・w)

知的なシステムを考えると結構簡単に(アイデアのしょぼさは問わず←)考えられます。
今回のiPhoneの指紋認証の発展を考えれば、PCのキーボードに手を置いた瞬間に認証されればいいでしょう。(そもそも椅子に座った段階でお尻で認証する研究もあった気がする。)
PC以外に考えると、例えば、ドアノブを回すときに認証を行う。認証できなかったら鍵を開けないでおくなど。


これかも、「知的」というキーワードでアイデアを探し続けていこうと思います。


下の本はブログ中にも書きました、三木先生の本です。


知的システム工学 (情報工学テキストシリーズ 2)
三木 光範
共立出版
売り上げランキング: 1,050,626

2013年9月12日木曜日

NFCとiBeaconを比較している記事に対して1つ言いたいことがある

iOS7の隠れキラーコンテンツとなる近距離無線通信「iBeacon」とは? 

iPhone5S, 5Cの発売に関してのこの記事についてです。
◆NFCよりも優れるBeacon 近距離無線通信技術としてNFCと競合するBeaconですが、様々な点でBeaconが優れています。
と、書かれていますが、本当に?と思っています。

トリガーが違うよ!

NFC

タッチ(かざす)ことがトリガー

iBeacon

通りがかる(近くによる)ことがトリガー


この2つの違いは大きいと思います。
NFCはユーザにとって明確なトリガー、iBeaconはユーザにとって不明確な(自然な)トリガーです。

必ずしもiBeaconがいいのではない!(ツン)

例えば、自動販売機でジュースをスマホで決済することを想像してください。

この場合、僕は、ボタンを押して自動で決済してくれるiBeaconよりも従来のNFCが優れていると思います。
なぜなら、購入者は本当に購入の意図があったかが確認できるからです。
(子供が勝手に違うものを選んだとかではなく)

iBeaconでも確認画面をつければいいじゃないか?って思う人もいるかもしれません。
でも、それってiBeaconの良さが無くね???NFCでよくね???と思います。


長所もあるよ!(デレ)

もちろんiBeaconにも長所はあります。
屋内位置推定が一番の長所かなと。
ユーザの行動を分析し自動で情報を受信できる。
現在はポスターにNFCを埋め込む形式の広告があります。

僕は「広告=ユーザに無理やり見せようとするもの」という考え方をしています。
CMやWEBだってそうです。
その中でユーザにとって有益な広告があれば、ユーザは反応するのです。

ポスターに埋め込んだNFCに意図的にタッチして情報を取りに行くよりかは、
ポスターの前を通りがかるとポスターが語りかけてくるほうがいいですよね!

だから、こういうものに対してはNFCよりもiBeaconのほうが強いのではないでしょうか。


まとめ

つまり、NFCもiBeaconも全く利用方法や応用範囲が違うのではないかと思います。
そして、Googleさん、Appleさん、
NFCもiBeaconもどっちも使えるようにしてしまえばいいじゃないw


Android NFCプログラミング完全ガイド (Smart Mobile Developer) オレンジタグス 業務用 FeliCa フェリカ ラベルシール 45x35 非接触 ICタグ FeliCa Lite , TL-L4
オレンジタグス 業務用 NFC Forum Type2 Tag 非接触ICカード Mifare Ultralight , TU-C1
株式会社オレンジタグス
売り上げランキング: 64,702


2013年7月26日金曜日

SublimeText2とGoogle日本語入力を使用して、日本語コメントを入力してENTER押すと消える問題(長っ


タイトルどおりです。
問題はどういうことかというと、日本語コメント入力して、


ENTER押すと・・・・


消えた・・・\(^o^)/

おそらくはコメント行を自動で補完してくれる優しさが日本語に上書きされるのが問題だと思われます。

ググったらやさしい方がGitHubに回避方法を公開していました。
http://koizuss.hatenablog.com/entry/2013/01/14/112350
https://gist.github.com/koizuss/4521934
お、Default.sublime-keymapの36行から3つ分をコメントすればいいみたい。
やっほい!

Default.sublime-keymapはSublimeを立ち上げて、
 Preference > Browse Packages...
から、
/Packages/DocBlockr/Default.sublime-keymap
で開ける。


・・・
・・・・・・
直らない・・・・

結局設定を読んでいるともう一箇所コメントしないといけないことに気づく。
コメントアウトしたら上記の問題が回避できた。

結局、設定はこのようになりました↓
合計4箇所コメントアウトしてます。

[
  // open a docblock with enter
  { "keys": ["enter"], "command": "jsdocs",
    "context": [
      { "key": "setting.auto_indent",   "operator": "equal",          "operand": true,                    "match_all": true },
      { "key": "selection_empty",       "operator": "equal",          "operand": true,                    "match_all": true },
      { "key": "auto_complete_visible", "operator": "equal",          "operand": false,                   "match_all": true },
      { "key": "preceding_text",        "operator": "regex_contains", "operand": "^\\s*(\\/\\*|###)\\*$", "match_all": true }
    ]
  },
  // open a docblock with keypad enter
  { "keys": ["keypad_enter"], "command": "jsdocs",
    "context": [
      { "key": "setting.auto_indent",   "operator": "equal",          "operand": true,                    "match_all": true },
      { "key": "selection_empty",       "operator": "equal",          "operand": true,                    "match_all": true },
      { "key": "auto_complete_visible", "operator": "equal",          "operand": false,                   "match_all": true },
      { "key": "preceding_text",        "operator": "regex_contains", "operand": "^\\s*(\\/\\*|###)\\*$", "match_all": true }
    ]
  },
  // open a docblock with tab
  { "keys": ["tab"], "command": "jsdocs",
    "context": [
      { "key": "setting.auto_indent",   "operator": "equal",          "operand": true,                    "match_all": true },
      { "key": "selection_empty",       "operator": "equal",          "operand": true,                    "match_all": true },
      { "key": "auto_complete_visible", "operator": "equal",          "operand": false,                   "match_all": true },
      { "key": "preceding_text",        "operator": "regex_contains", "operand": "^\\s*(\\/\\*|###)\\*$", "match_all": true }
    ]
  },

  /**
   * Google日本語入力を使っている場合のENTERで入力内容が消える問題に対応
   * ↓をコメントアウトすることでとりあえず入力できるようになる
   * (Docコメント内で改行しても整形されなくなる)
   */

  // // extend a docblock by adding an asterisk at the start
  // { "keys": ["enter"], "command": "insert_snippet", "args": {"contents": "\n${TM_CURRENT_LINE/^\\s*(\\*\\s*).*$/$1/}"},
  //   "context": [
  //     { "key": "setting.auto_indent",   "operator": "equal",          "operand": true,              "match_all": true },
  //     { "key": "selector",              "operator": "equal",          "operand": "comment.block",   "match_all": true },
  //     { "key": "auto_complete_visible", "operator": "equal",          "operand": false,             "match_all": true },
  //     { "key": "preceding_text",        "operator": "regex_contains", "operand": "^\\s*\\*\\s*\\S", "match_all": true }
  //   ]
  // },
  // // extend a docblock by adding an asterisk at the start
  // { "keys": ["enter"], "command": "insert_snippet", "args": {"contents": "\n${TM_CURRENT_LINE/^\\s*(\\*\\s*).*$/$1/}"},
  //   "context": [
  //     { "key": "setting.auto_indent",   "operator": "equal",          "operand": true,            "match_all": true },
  //     { "key": "selector",              "operator": "equal",          "operand": "comment.block", "match_all": true },
  //     { "key": "auto_complete_visible", "operator": "equal",          "operand": false,           "match_all": true },
  //     { "key": "preceding_text",        "operator": "regex_contains", "operand": "^\\s*\\*",      "match_all": true }
  //   ]
  // },
  // // extend a docblock with keypad enter by adding an asterisk at the start
  // { "keys": ["keypad_enter"], "command": "insert_snippet", "args": {"contents": "\n${TM_CURRENT_LINE/^\\s*(\\*\\s*).*$/$1/}"},
  //   "context": [
  //     { "key": "setting.auto_indent",   "operator": "equal",          "operand": true,            "match_all": true },
  //     { "key": "selector",              "operator": "equal",          "operand": "comment.block", "match_all": true },
  //     { "key": "auto_complete_visible", "operator": "equal",          "operand": false,           "match_all": true },
  //     { "key": "preceding_text",        "operator": "regex_contains", "operand": "^\\s*\\*",      "match_all": true }
  //   ]
  // },

  // trim the automatically added whitespace
  { "keys": ["enter"], "command": "jsdocs_trim_auto_whitespace",
    "context": [
      { "key": "setting.auto_indent",                "operator": "equal",          "operand": true,            "match_all": true },
      { "key": "selector",                           "operator": "equal",          "operand": "comment.block", "match_all": true },
      { "key": "auto_complete_visible",              "operator": "equal",          "operand": false,           "match_all": true },
      { "key": "setting.trim_automatic_white_space", "operator": "equal",          "operand": true,            "match_all": true },
      { "key": "preceding_text",                     "operator": "regex_contains", "operand": "^\\s*\\*\\s*$", "match_all": true },
      { "key": "following_text",                     "operator": "regex_contains", "operand": "^\\s*$",        "match_all": true }
    ]
  },
  // trim the automatically added whitespace
  { "keys": ["keypad_enter"], "command": "jsdocs_trim_auto_whitespace",
    "context": [
      { "key": "setting.auto_indent",                "operator": "equal",          "operand": true,            "match_all": true },
      { "key": "selector",                           "operator": "equal",          "operand": "comment.block", "match_all": true },
      { "key": "auto_complete_visible",              "operator": "equal",          "operand": false,           "match_all": true },
      { "key": "setting.trim_automatic_white_space", "operator": "equal",          "operand": true,            "match_all": true },
      { "key": "preceding_text",                     "operator": "regex_contains", "operand": "^\\s*\\*\\s*$", "match_all": true },
      { "key": "following_text",                     "operator": "regex_contains", "operand": "^\\s*$",        "match_all": true }
    ]
  },
  // extend line comments (// and #)
  /**
   * ここでENTERキーを押してもコメントの行が自動補完されないようにする。
   */
//  { "keys": ["enter"], "command": "insert_snippet", "args": {"contents": "\n${TM_CURRENT_LINE/^\\s*((?:#|\\/\\/)\\s*).*/$1/}"},
//    "context": [
//      { "key": "setting.auto_indent",                "operator": "equal",          "operand": true,              "match_all": true },
//      { "key": "setting.jsdocs_extend_double_slash", "operator": "equal",          "operand": true,              "match_all": true },
//      { "key": "selector",                           "operator": "equal",          "operand": "comment.line",    "match_all": true },
//      { "key": "auto_complete_visible",              "operator": "equal",          "operand": false,             "match_all": true },
//      { "key": "preceding_text",                     "operator": "regex_contains", "operand": "^\\s*(\\/\\/|#)", "match_all": true }
//    ]
//  },
  // extend line comments (// #) with keypad enter
  { "keys": ["keypad_enter"], "command": "insert_snippet", "args": {"contents": "\n${TM_CURRENT_LINE/^\\s*((?:#|\\/\\/)\\s*).*$/$1/}"},
    "context": [
      { "key": "setting.auto_indent",                "operator": "equal",          "operand": true,           "match_all": true },
      { "key": "setting.jsdocs_extend_double_slash", "operator": "equal",          "operand": true,           "match_all": true },
      { "key": "selector",                           "operator": "equal",          "operand": "comment.line", "match_all": true },
      { "key": "auto_complete_visible",              "operator": "equal",          "operand": false,          "match_all": true },
      { "key": "preceding_text",                     "operator": "regex_contains", "operand": "^\\s*\\/\\/",  "match_all": true }
    ]
  },
  // close a block comment (/*  */)
  { "keys": ["enter"], "command": "insert_snippet", "args": {"contents": "\n$0\n */"},
    "context": [
      { "key": "selection_empty", "operator": "equal",          "operand": true,           "match_all": true },
      { "key": "preceding_text",  "operator": "regex_contains", "operand": "^\\s*\\/\\*$", "match_all": true }
    ]
  },
  // close a block comment (/*  */)
  { "keys": ["keypad_enter"], "command": "insert_snippet", "args": {"contents": "\n$0\n */"},
    "context": [
      { "key": "selection_empty", "operator": "equal",          "operand": true,           "match_all": true },
      { "key": "preceding_text",  "operator": "regex_contains", "operand": "^\\s*\\/\\*$", "match_all": true }
    ]
  },
  { "keys": ["enter"], "command": "insert_snippet", "args": {"contents": "\n$0\n "}, "context":
    [
      { "key": "selection_empty", "operator": "equal",          "operand": true,           "match_all": true},
      { "key": "preceding_text",  "operator": "regex_contains", "operand": "^\\s*\\/\\*$", "match_all": true},
      { "key": "following_text",  "operator": "regex_contains", "operand": "^\\*\\/\\s*$", "match_all": true}
    ]
  },
  { "keys": ["keypad_enter"], "command": "insert_snippet", "args": {"contents": "\n$0\n "}, "context":
    [
      { "key": "selection_empty", "operator": "equal",          "operand": true,           "match_all": true},
      { "key": "preceding_text",  "operator": "regex_contains", "operand": "^\\s*\\/\\*$", "match_all": true},
      { "key": "following_text",  "operator": "regex_contains", "operand": "^\\*\\/$",     "match_all": true}
    ]
  },
  // De-indent at the end of a comment block
  { "keys": ["enter"], "command": "jsdocs_deindent",
    "context": [
      { "key": "selection_empty", "operator": "equal",          "operand": true,        "match_all": true },
      { "key": "preceding_text",  "operator": "regex_contains", "operand": "^\\s+\\*/", "match_all": true }
    ]
  },
  // de-indent at the end of a comment block with keypad-enter
  { "keys": ["keypad_enter"], "command": "jsdocs_deindent",
    "context": [
      { "key": "selection_empty", "operator": "equal",          "operand": true,        "match_all": true },
      { "key": "preceding_text",  "operator": "regex_contains", "operand": "^\\s+\\*/", "match_all": true }
    ]
  },
  // Open an inline docblock (/** */)
  { "keys": ["shift+enter"], "command": "jsdocs", "args": {"inline": true},
    "context": [
      { "key": "setting.auto_indent",   "operator": "equal",          "operand": true,              "match_all": true },
      { "key": "selection_empty",       "operator": "equal",          "operand": true,              "match_all": true },
      { "key": "auto_complete_visible", "operator": "equal",          "operand": false,             "match_all": true },
      { "key": "preceding_text",        "operator": "regex_contains", "operand": "^\\s*\\/\\*{2}$", "match_all": true }
    ]
  },
  // Open an inline docblock
  { "keys": ["shift+keypad_enter"], "command": "jsdocs", "args": {"inline": true},
    "context": [
      { "key": "setting.auto_indent",   "operator": "equal",          "operand": true,              "match_all": true },
      { "key": "selection_empty",       "operator": "equal",          "operand": true,              "match_all": true },
      { "key": "auto_complete_visible", "operator": "equal",          "operand": false,             "match_all": true },
      { "key": "preceding_text",        "operator": "regex_contains", "operand": "^\\s*\\/\\*{2}$", "match_all": true }
    ]
  },
  // show the autocomplete
  { "keys": ["@"], "command": "run_macro_file", "args": {"file": "Packages/DocBlockr/jsdocs-auto-complete.sublime-macro"},
    "context": [
      { "key": "setting.auto_complete", "operator": "equal",    "operand": true,                           "match_all": true },
      { "key": "selection_empty", "operator": "equal",          "operand": true,                           "match_all": true },
      { "key": "preceding_text",  "operator": "regex_contains", "operand": "^\\s*(?:\\/\\*|###)?\\*\\s*$", "match_all": true },
      { "key": "selector",        "operator": "equal",          "operand": "comment.block",                "match_all": true }
    ]
  },
  // show the autocomplete in a coffee doc block
  { "keys": ["@"], "command": "run_macro_file", "args": {"file": "Packages/DocBlockr/jsdocs-auto-complete.sublime-macro"},
    "context": [
      { "key": "selection_empty", "operator": "equal",          "operand": true,                              "match_all": true },
      { "key": "preceding_text",  "operator": "regex_contains", "operand": "^\\s*#\\s*$",                     "match_all": true },
      { "key": "selector",        "operator": "equal",          "operand": "comment.line.number-sign.coffee", "match_all": true }
    ]
  },
  // indent to align with the previous line
  { "keys": ["tab"], "command": "jsdocs_indent",
    "context": [
      { "key": "setting.jsdocs_deep_indent", "operator": "equal",          "operand": true,            "match_all": true },
      { "key": "setting.auto_indent",        "operator": "equal",          "operand": true,            "match_all": true },
      { "key": "selection_empty",            "operator": "equal",          "operand": true,            "match_all": true },
      { "key": "preceding_text",             "operator": "regex_contains", "operand": "^\\s*\\*\\s*$", "match_all": true },
      { "key": "selector",                   "operator": "equal",          "operand": "comment.block", "match_all": true }
    ]
  },
  // decorate a double-slash comment
  { "keys": ["ctrl+enter"], "command": "jsdocs_decorate",
    "context": [
      { "key": "selector", "operator": "equal", "operand": "comment.line.double-slash"}
    ]
  },
  // decorate a double-slash comment
  { "keys": ["ctrl+keypad_enter"], "command": "jsdocs_decorate",
    "context": [
      { "key": "selector", "operator": "equal", "operand": "comment.line.double-slash"}
    ]
  },
  // join lines inside a comment block, stripping the leading asterisk
  { "keys": ["ctrl+j"], "command": "jsdocs_join",
    "context": [
      { "key": "selector", "operator": "equal", "operand": "comment.block" }
    ]
  },
  // join lines in a line comment, stripping the leading // or #
  { "keys": ["ctrl+j"], "command": "jsdocs_join",
    "context": [
      { "key": "selector", "operator": "equal", "operand": "comment.line" }
    ]
  },
  // reparse a comment block's placeholders
  { "keys": ["ctrl+alt+tab"], "command": "jsdocs_reparse",
    "context": [
      { "key": "selector", "operator": "equal", "operand": "comment.block" }
    ]
  },
  { "keys": ["alt+q"], "command": "jsdocs_wrap_lines",
    "context": [
      { "key": "selector", "operator": "equal", "operand": "comment.block", "match_all": true }
    ]
  },

  // add line after, in a DocBlock
  { "keys": ["ctrl+enter"], "command": "run_macro_file", "args": {"file": "Packages/DocBlockr/Add DocBlockr Line.sublime-macro"},
    "context": [
      { "key": "setting.auto_indent",   "operator": "equal",          "operand": true,            "match_all": true },
      { "key": "selector",              "operator": "equal",          "operand": "comment.block", "match_all": true },
      { "key": "auto_complete_visible", "operator": "equal",          "operand": false,           "match_all": true },
      { "key": "preceding_text",        "operator": "regex_contains", "operand": "^\\s*\\*",      "match_all": true }
    ]
  },

  // add line before, in a DocBlock
  { "keys": ["ctrl+shift+enter"], "command": "run_macro_file", "args": {"file": "Packages/DocBlockr/Add DocBlockr Line Before.sublime-macro"},
    "context": [
      { "key": "setting.auto_indent",   "operator": "equal",          "operand": true,            "match_all": true },
      { "key": "selector",              "operator": "equal",          "operand": "comment.block", "match_all": true },
      { "key": "auto_complete_visible", "operator": "equal",          "operand": false,           "match_all": true },
      { "key": "preceding_text",        "operator": "regex_contains", "operand": "^\\s*\\*",      "match_all": true }
    ]
  }
]


2013年1月3日木曜日

Android端末でGAEブロブストア上の画像の取得

Basic認証とストレージに画像保存とイメージビューに画像を保存まで。

package com.taku.nfchome;

import java.io.ByteArrayOutputStream;
import java.io.File;
import java.io.FileOutputStream;
import java.io.IOException;
import java.io.InputStream;
import java.io.UnsupportedEncodingException;
import java.net.HttpURLConnection;
import java.net.URL;
import java.text.SimpleDateFormat;
import java.util.Arrays;
import java.util.Date;
import java.util.List;

import org.apache.http.Header;
import org.apache.http.HttpEntity;
import org.apache.http.HttpResponse;
import org.apache.http.NameValuePair;
import org.apache.http.auth.AuthScope;
import org.apache.http.auth.UsernamePasswordCredentials;
import org.apache.http.client.ClientProtocolException;
import org.apache.http.client.HttpClient;
import org.apache.http.client.entity.UrlEncodedFormEntity;
import org.apache.http.client.methods.HttpGet;
import org.apache.http.client.methods.HttpHead;
import org.apache.http.client.methods.HttpPost;
import org.apache.http.entity.BufferedHttpEntity;
import org.apache.http.impl.client.DefaultHttpClient;
import org.apache.http.util.EntityUtils;

import extra.UrlManager;

import android.app.Activity;
import android.graphics.Bitmap;
import android.graphics.Bitmap.CompressFormat;
import android.graphics.BitmapFactory;
import android.os.AsyncTask;
import android.os.Bundle;
import android.os.Environment;
import android.util.Log;
import android.widget.ImageView;

public class ImageActivity extends Activity {
 @Override
 protected void onCreate(Bundle savedInstanceState) {
  super.onCreate(savedInstanceState);
  setContentView(R.layout.image_activity);
  final ImageView iv = (ImageView)findViewById(R.id.imageView);
  
  new AsyncTask() {
   @Override
   protected Bitmap doInBackground(String... params) {
    Bitmap bmp = null;
    try{
     DefaultHttpClient httpClient = new DefaultHttpClient();
     String url = new String(params[0]);
     HttpGet request = new HttpGet(url);
     // 認証するUserとPW
     UsernamePasswordCredentials credentials = new UsernamePasswordCredentials("「ユーザ名」","「パスワード」");
     AuthScope scope = new AuthScope(request.getURI().getHost(), request.getURI().getPort());
     httpClient.getCredentialsProvider().setCredentials(scope, credentials);
     
     HttpResponse httpResponse = httpClient.execute(request);
        
        // ステータスコードを取得
        int statusCode = httpResponse.getStatusLine().getStatusCode();
        
        HttpGet httpRequest = new HttpGet(url); 
        
        //ーーー画像生成処理ーーー
        HttpResponse response = (HttpResponse) httpClient.execute(httpRequest); 
        HttpEntity entity1 = response.getEntity();
        BufferedHttpEntity bufHttpEntity = new BufferedHttpEntity(entity1);
        InputStream is = bufHttpEntity.getContent();
        bmp = getBitmap(is);
        // リソースを解放
        entity1.consumeContent();
        // クライアントを終了させる
        httpClient.getConnectionManager().shutdown();
    } catch (UnsupportedEncodingException e) {
     e.printStackTrace();
    } catch (ClientProtocolException e) {
     e.printStackTrace();
    } catch (IOException e) {
     e.printStackTrace();
    }
    
    return bmp;
   }
   @Override
   protected void onPostExecute(Bitmap bmp) {
    Log.v("image", "ok");
    iv.setImageBitmap(bmp);
    saveBitmapToSd(bmp);
    
   }
   
  }.execute("「URL」");
 }
 /**
  * 画像に変換
  * @param is
  * @return
  */
 public static Bitmap getBitmap(InputStream is) {
  Bitmap bmp = null;
  byte[] line = new byte[1024];
  int byteSize = 0;
  try {
   // バイト単位での読込
   ByteArrayOutputStream out = new ByteArrayOutputStream();
   while ((byteSize = is.read(line)) > 0) {
    out.write(line, 0, byteSize);
   }
   // オプション
   BitmapFactory.Options options = new BitmapFactory.Options();
   options.inSampleSize = 0;
   
   byte[] byteArray = out.toByteArray();
   Log.v("image", "byteArray.length = " + byteArray.length);
   bmp = BitmapFactory.decodeByteArray(byteArray, 0, byteArray.length, options);
   is.close();
  } catch (Exception e) {
   e.printStackTrace();
  }
  return bmp;
 }
 /**
  * 画像をストレージへ保存
  * @param mBitmap
  */
 public void saveBitmapToSd(Bitmap mBitmap) {
  try {
  // sdcardフォルダを指定
  File root = Environment.getExternalStorageDirectory();

  // 日付でファイル名を作成 
  Date mDate = new Date();
  SimpleDateFormat fileName = new SimpleDateFormat("yyyyMMdd_HHmmss");

  // 保存処理開始
  FileOutputStream fos = null;
  fos = new FileOutputStream(new File(root, fileName.format(mDate) + ".jpg"));
  Log.v("image", (new File(root, fileName.format(mDate) + ".jpg").toString()));
  // jpegで保存
  mBitmap.compress(CompressFormat.JPEG, 100, fos);
  // 保存処理終了
  fos.close();
  } catch (Exception e) {
   Log.e("Error", "" + e.toString());
  }
 }
}

2012年12月4日火曜日

Androidのタッチイベント(ICS)

Androidのタッチイベントについてのまとめ(API8以降の場合)

・マルチタッチする際のポインタ(指)のidの取得方法
  int index = event.getActionIndex();
  int id = event.getPointerId(index);
・マルチタッチの場合はevent.getActionMasked()を使ってイベントを判定
 マルチタッチの場合はMotionEvent.ACTION_POINTER_DOWNを使う。
 この際getAction()ではなく、getActionMasked()を使う。※getAction()ではない。
switch (event.getActionMasked()) {
 case MotionEvent.ACTION_DOWN:
  //指1本でタッチした時
  break;
 case MotionEvent.ACTION_POINTER_DOWN:
  //指2本目以降でタッチした時
  break;
・タッチされた指が2本目か3本目かを判定したい場合はACTION_POINTER_DOWNの場合に、getPointerCount()を用いる
switch (event.getActionMasked()) {
 case MotionEvent.ACTION_POINTER_DOWN:
  //指2本目以降でタッチした時
  if(event.getPointerCount() == 2){
   //2本指の時の処理
  }
  break;

2012年11月22日木曜日

GoogleAppEngine(GAE)でのBasic認証に関して

GAEでBasic認証をした時に参考にしたサイトのメモ
@tomorierさんの記事が参考になりました。ありがとうございます。


おおまかに3つの手順
・filterを作る
・filterをweb.xmlでBasic認証したいサーブレットと結びつける
・アカウントとパスワードを管理するファイルを作成する

filterクラスもリンク先のリンク先にサンプルがある。

ちなみに、パスワードファイルの

 User1=test
User2=test2

は、アカウント名が左でパスワードが右ですね。

2012年11月15日木曜日

ListViewの内容取得(ListView拡張、カスタムListView、カスタムAdapter)

AndroidのListViewをカスタマイズしたい、データによって背景の色を変えたいと思っていろいろ調べたので分かった範囲でメモ。
やりたいこと
・ListViewの1行ごとの内容(オブジェクト)を取得
・取得したオブジェクト内のフラグによって背景色を塗り分ける
・1行内のレイアウトを自由に行う
・ListViewは1行ごとにレイアウトを指定できる。
 例)twitterみたいに、画像を左、アカウント名を右上、テキストを右下など


で、こんな感じにできた。


手順
1.ListViewの1行のレイアウトを作成
レイアウトをxmlで作る
idとかを指定しておく
【past_order_item.xml】


2.ListView自体のレイアウトの作成
説明することは特になし
(Activityに貼付けるレイアウトのこと)
【past_order.xml】
ここのTextViewはListViewに表示するリストが無い場合だけ表示される


3.ListViewの1行に貼付けたい情報やフラグをもったオブジェクトのクラスの宣言
  ここは自分で好きなようなクラスを作ってください。
  (※不必要なフィールドも書いてたりします)   【PastOrder.java】
public class PastOrder {
 private String order;   
 private String num;    
 private Long dateLong;
 private Date date;
 private String dateString;
 public PastOrder(String order, String num, String dateString) {
  super();
  this.order = order;
  this.num = num;
  this.dateString = dateString;
 }
 public String getOrder() {
  return order;
 }
 public void setOrder(String order) {
  this.order = order;
 }
 public String getNum() {
  return num;
 }
 public void setNum(String num) {
  this.num = num;
 }
 public String getFormatDate(){
  Date date = new Date(dateLong);
  SimpleDateFormat sdf = new SimpleDateFormat("yyyy/MM/dd  HH:mm:ss", Locale.JAPAN);
  return sdf.format(date);
 }
 public boolean isCompleted() {
  return isCompleted;
 }
 public void setCompleted(boolean isCompleted) {
  this.isCompleted = isCompleted;
 }
 public String getDateString() {
  return dateString;
 }
 public void setDateString(String dateString) {
  this.dateString = dateString;
 }
}


4.アダプターの作成(ここがメイン!!)
アダプターとはListViewに貼付けたいデータとレイアウトへの貼付けを行うもの(であってる?)
アダプターの拡張をして、ここで背景の判定とかを行う

ArrayAdapterの拡張をおこなう
(ここでTは先ほど作ったPastOrderクラスとしている) コンストラクタ
 LayoutInflaterオブジェクトの生成
 1行ごとのレイアウトを指定して、データを貼付けたりできる
getView()・・・1行ごとに実行されるメソッド
 convertView==nullならinflate
 ポジションからT itemの取得
あとはitemオブジェクトを好きなように煮て食う
 (今回はオーダー情報から調理完了かどうかをみて背景色を変更する処理を行っている)

public class OrderArrayAdapter extends ArrayAdapter{
 private Context myContext;
 private LayoutInflater li;

 public OrderArrayAdapter(Context context, List objects) {
  super(context, 0, objects);
  myContext = context;
  li = (LayoutInflater)myContext.getSystemService(Context.LAYOUT_INFLATER_SERVICE);
 }

   //ListViewの1行ごとに呼び出されるメソッド
  //ここで1行ごとオブジェクトを取得し、好きな処理を行う
 @Override
 public View getView(int position, View convertView, ViewGroup parent) {
  int UNCOMPLETE_COLOR = myContext.getResources().getColor(R.color.status_item_background_complete);
  int COMPLETE_COLOR = myContext.getResources().getColor(R.color.status_item_background_uncomplete);

  if(convertView == null){
   convertView = li.inflate(R.layout.past_order_item, null);
  }
  //対象の行のアイテムを取得
  PastOrder pastOrder = (PastOrder)this.getItem(position);

  if(pastOrder != null){
   //テキストビューの生成
   TextView pastOrderName = (TextView)convertView.findViewById(R.id.pastOrderName);
   TextView pastOrderNum = (TextView)convertView.findViewById(R.id.pastOrderNum);
   TextView pastOrderDate = (TextView)convertView.findViewById(R.id.pastOrderDate);
   //1行のビューに名前、数量、日時の設定
   if(pastOrderName != null){
    pastOrderName.setText(pastOrder.getOrder());
   }
   if(pastOrderNum != null){
    pastOrderNum.setText(pastOrder.getNum());
   }
   if(pastOrderDate != null){
    pastOrderDate.setText(pastOrder.getDateString());
   }
   //背景色を調理完了かどうかで色分け
   if(pastOrder.isCompleted()){
    convertView.setBackgroundColor(COMPLETE_COLOR);
    Log.v("Adapter", position+"\t"+"comp"+"\t"+pastOrder.getOrder());
   }else{
    convertView.setBackgroundColor(UNCOMPLETE_COLOR);
    Log.v("Adapter", position+"\tuncomp"+"\t"+pastOrder.getOrder());
   }
  }
  return convertView;
 }
}


5.ListViewActivity
ListViewに貼付けるデータの生成
アダプターのセット

protected void onCreate(Bundle savedInstanceState) {
 super.onCreate(savedInstanceState);
 setContentView(R.layout.past_order);
 //リストに貼付けるデータの作成
 List pastOrderList = createPastData2(result);
 //過去のオーダ情報をレイアウトに表示
 setPastOrderToView3(pastOrderList);
}
private List createPastData2(JSONArray jArr){
 //TODO PastOrderクラスのインスタンスを登録する
 List pastOrderList = new ArrayList();
 JSONObject jObj;
 for(int i = 0; i < jArr.length(); i++){
  try {
   jObj = jArr.getJSONObject(i);
        //---------------------------
        //ここでPastOrderインスタンスを作成し、リストに登録していく
   String order = jObj.getString("order");
   String num = jObj.getString("num");
   Long dateLong = jObj.getLong("date");
   Date date = new Date(dateLong);
   boolean completed = jObj.getBoolean("completed");
   SimpleDateFormat sdf = new SimpleDateFormat("yyyy/MM/dd  HH:mm:ss", Locale.JAPAN);    
   PastOrder pastOrder = new PastOrder(order, num, sdf.format(date), completed);
   pastOrderList.add(pastOrder);
        //---------------------------
  } catch (JSONException e) {
   e.printStackTrace();
  }
 }
 return pastOrderList;
}
private void setPastOrderToView3(List pastOrderList){
 Log.v("Adapter", pastOrderList.size()+"-------");
 mOrderArrayAdapter = new OrderArrayAdapter(this,pastOrderList);
   //---------------------------
   //アダプターをセットする!正直メソッドにする必要はないッ!!!
 setListAdapter(mOrderArrayAdapter);
}
ほぼ、この流れで「オブジェクトをListViewに貼付けて、オブジェクトごとに背景色を塗り分ける」という処理が実装できるはず。
何かコメントなどあればお願いします。
(※いろいろ消してるのでたぶんこのままでは動きません)

2012年1月26日木曜日

Android(GalaxyS)でPC版サイトを見る

AndroidでWEBページにアクセスすると、Androidスマホ用のページに飛ばされることがある。
JavascriptでUserAgent(UA)を判別して、スマホ用のページかPC用のページかを変えるらしい。
UAについてはここ
スマホ用のページではなくPC用やiPhone用のページを取得したい場合はUAを変更する。

GalaxyS標準ブラウザのUA変更方法
1.ブラウザを立ち上げる
2.URL入力欄に「about:useragent」と入力し決定する
3.そこで「Desktop」と入力すればPC用のサイトを見られる

※ブラウザを終了すると設定はもとに戻ってしまうみたい。
※「about:useragent」でUAの選択肢が出てこない場合は「about:debug」と入力し、メニュー→設定→UAstringらしい

ちなみにGalaxySのUAの選択肢は
GalaxyS
Iphone
Desktop
Lismore
NexusOne
Custom
とあるけど、「Iphone」って・・・ださいw

2011年12月7日水曜日

簡易Webブラウザ

WebViewを用いることでHTMLを表示することができる。

まず、レイアウトでWebViewを作る。


WebViewの生成
//WebViewの生成
webView = (WebView)findViewById(R.id.webview);
WebSettings settings = webView.getSettings();
settings.setJavaScriptEnabled(true);
settings.setSavePassword(false);
settings.setSaveFormData(false);
settings.setSupportZoom(true);
settings.setBuiltInZoomControls(true);

webページの読み込み
webView.loadUrl("http://www.google.co.jp/");

Hello,World!

このブログはAndroid開発や、他の個人的なメモ、参考にしたサイトのまとめなどに使ったりします。

内容などが間違ってたりする場合があるかもしれませんが、お許しください。